Get started with Payments
Start accepting payments online and boost your business to new heights.
Set up an account
As soon as you create your Rebill account, you'll be able to start using it in Sandbox mode. This is an environment developed for testing out your integrations.
While in Sandbox, you can simulate using all of Rebill's features without moving real money. After you activate you account, you'll be able to accept real payments, handle subscriptions, sharing local-to-local & crossborder payment links, make instant charges with tokenized cards, and many other features our all-in-one solution can bring to the table.
Sign up and create your Rebill account
Follow the steps in our dashboard to successfully create an account.
Get your productive keys
Once you have your account up and running, you can switch from Sandbox to Production mode by just one click in the dashboard's switch button.

You'll be asked to fill in our KYB form. This is a mandatory regulation we need to comply with in order to be able to provide you with a payments service that is reliable and transparent. After this, production keys for Rebill Gateway will be provided for you so you can start accepting payments online across Latin America.
Payments Status
Here's a list of possible statuses for a payment transaction:
- Succeeded: The payment has been completed successfully.
- Pending: The payment is in process and will soon change status to either "succeeded" or "rejected".
- Rejected: The payment could not be completed (more details on failed payments below).
- Refunded: The payment was refunded, so it has been returned to the customer. You can refund payments manually by clicking on the "refund" button from the dropdown placed at the right of each payment row.
- Expired: The payment has not been completed by the customer within the 24 hours from its creation.
Installments Overview
Allow your customers to pay by installments when doing a checkout by credit card.
Installments provide customers with the flexibility to spread the cost of their purchases over time, reducing barriers to completing their transactions and potentially decreasing churn. This adds up to a win-win equation for both your business and your customers. Learn more about our Installments feature in this guide.
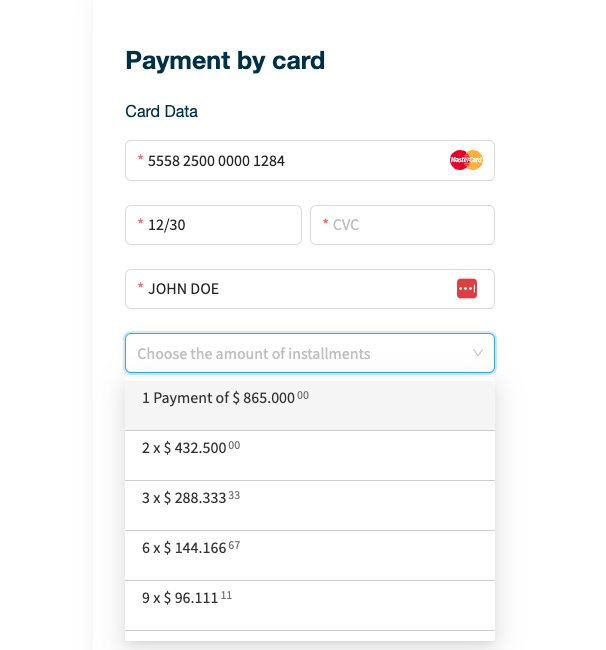
Installments in Checkout Landing
In our Checkout Landing, we've already built a seamless process for you. When a customer selects the credit card payment option, and if installments are applicable in their country, a dropdown menu will automatically appear, giving them the choice to pay in installments.
Keep in mind that what you are offering to your customers is just the possibility of paying this way: the installment plan – if it exists – will be in charge of the card provider.
Also, your payment must be one-time. This means that Installments are not compatible with recurrent or cyclical payments. See more on how to create one-time payments here.
You can offer Installments in Colombia and Chile with 0% APR (Annual Percentage Rate).
Start with Coupons & Discounts
Apply discounts to subscriptions and one-time payments with coupons and discount codes and enhance your marketing strategies.
You can easily create a coupon and apply it to your customers' subscriptions. Also, you can create discount codes and share them with your customers, who can redeem them on the checkout page.
In summary, you can use coupons and coupon codes to:
- Apply flat or percentage discounts on current subscriptions.
- Tailor the application frequency of discounts to your subscriptions. Choose whether to apply discounts just once, multiple times, or have unlimited applications for as long as the subscription remains active.
- Share discount codes with your customers, allowing them to apply these codes during the purchase process on the checkout page.
You can also set an expiration date for the coupon (see "Redeem by" property) and restrict the maximum number of times the coupon can be redeemed.
Coupons
Apply discounts to existing subscriptions by following the next steps.
Create a coupon
- On your Rebill Dashboard, click the Products category in the superior menu bar.
- Click Coupons in the lateral left menu bar.
- Click the Create coupon button in the upper right corner.
- In the Create Coupon screen, fill in the coupon parameters.
- Click Generate.
These are the settings for coupons:
| Setting | Description |
|---|---|
| Name | The name of the coupon. Use this to identify them with ease. |
| Description (optional) | Used to describe your coupon better. |
| Discount type | Determines whether a coupon discount on an amount is fixed (flat) or a percentage. |
| Discount duration | Defines how long a coupon discount will apply on a subscription. |
| Redeem by (optional) | Set a specific date range within which your customers can redeem a coupon. |
| Max redemptions (optional) | Limit the maximum number of times a coupon can be redeemed. |
| Discount codes (optional) | Create discount codes for the coupon to share with your customers. |
Attach coupons to subscriptions
After you have successfully generated a coupon, you can apply it to an existing subscription.
To do that, it's as simple as this:
- On your Rebill Dashboard, click on Payments in the top navigation bar.
- Click on Subscriptions in the side menu.
- Click on the subscription you want to apply a discount to.
- In the Subscription Details view, click on Edit.
- In the Link a coupon field, select the coupon you want to apply.
- Click on Save.
Archive coupons
You can archive a coupon if you don't want to use it anymore. Archiving a coupon does not remove any currently active discounts resulting from its previous application to subscriptions.
To archive a coupon, follow this steps:
- On your Rebill Dashboard, click on Products in the top navigation bar.
- Click on Coupons in the side menu.
- Hover over the dotted button on the left side of the coupon that you want to archive.
- Click on Archive.
Also, you can archive a coupon in the Coupon Details screen by clicking on Archive in the upper right corner.
Coupon discount duration
When a coupon is applied to a subscription, the discount duration determines the number of times the coupon discount will be applied. For example, if a coupon offers a 25% discount and has a discount duration of 3 times, the discount will be applied during the checkout process and for the next two charges of the subscription.
If you set the discount duration as once, then the coupon will apply just once. A discount duration set to forever means the coupon will apply indeterminately until the subscription is canceled or finalized.
Maximum redemptions limit
The maximum redemptions property allows you to limit how many times a coupon can be applied to a subscription and redeemed by customers through discount codes related to the coupon. For example, if you set the maximum redemptions to 100, and you attach this coupon to 50 subscriptions, then you create a discount code related to the coupon that will be able to be redeemed 50 times by your customers.
If your coupon has an expiration date and it expires before reaching the maximum redemption limit, it will no longer be applicable to new subscriptions. Additionally, the discount codes related to the coupon will no longer able to be redeemed by customers.
Discount codes
Discount codes are the codes you create for coupons, and you will share them with your customers to use at your Checkout Landing.
For example, suppose you have created a coupon that will expire on the last day of the month and you have limited the maximum number of redemptions to 100. In this case, the first 100 customers who apply the discount codes BLACKFRIDAY or NOVEMBEROFF in the Checkout Landing will be able to redeem them. Alternatively, these codes will automatically expire on the last day of the month, whichever comes first.
Create discount codes
- On your Rebill Dashboard, click on Products in the top navigation bar.
- Click on Coupons in the side menu.
- Click the Create coupon button in the upper right corner.
- In the Create Coupon screen, fill in the coupon parameters.
- Click on the switch Discount codes
- Complete the discount code name.
- Select Add another code to create more than one discount code.
- Click on Generate.
Add promotion codes to Checkout Landing
- On your Rebill Dashboard, click on Products in the superior menu bar.
- Click on the product you want to allow discount codes for.
- Click on Edit Link if it already has one, otherwise click Create Link.
- Mark Allow use discount codes. option.
- Press Ok.
After following the previous steps, your customers will be able to redeem discount codes in their purchases at Checkout Landing.
Share a payment link with a prefilled discount code
Add the query param discountCode with the name of the discount code you want to add to your Payment Link URL.
Here's how it would look if you wish to add the discount code BLACKFRIDAY to a payment link: https://pay.rebill.com/{organizationalias}/price/{priceid}?discountCode=BLACKFRIDAY